Sunday, May 30, 2021

KoW: Easterings vs Goblins

 A wet, rainy day down in Oamaru today. I popped around to Gordon's for a game of Kings of War vs Josh and his goblin horde. Josh is till putting his army together so used some of  Gordon's figures to stand in for his goblin hordes.

Josh's army was approximately:

  • 2x goblin hordes
  • 2x morax regiments (allies)
  • 3xgiants
  • 1x mawbeast pack
  • 2x mawbeast troop
  • A king on a chariot
  • Kuzlo and Madfall- with entrall
  • A Couple of other characters- one with a boomstick

I ran my Easterlings and think I've settled on my final list. I'd swapped the bow regiment and mounted hereo for a second giant. So i was outnumbered 3:2 in giants! 

  • 3x knight regiments
  • 2x mounted scout troops
  • 1x shield wall horde with hammer of measured strength
  • 2x giants
  • 1x general on a fell beast
  • Wizard with boomstick
Mission: Raze

I'ds not played this one before. We each placed 3 objective markers on the opponents side of the board and there as a central one. At the end of each of your turn from turn 2 onwards you can claim the victory makers you placed on the other side of the table. 

I'd not played goblins (and allies before) so was a bit unsure what to expect. I planned to try to avoid the giants and Morax units as long as possble. I'd placed two of my markers on the right hand side of the table, one on the left. 

I hoped to beat the goblins on one flank or the other and use my superoir mobility ot exploit openings. I wanted my shieldwall to hold the centre as long as possible and try to win the game on the flanks.

Deployment


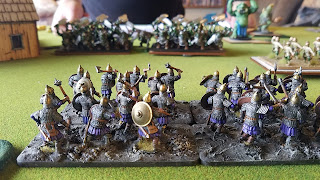
I won the roll to go first and chose not to. Josh moved his king on a chariot through the forest and the nearby mawbeast regiment ot assist. My impetuous knights decided to charged the kiing's chariot but rolled poorly and failed to destroy the king. I wasn't 100% sure on that but decided to ive it a crack, my original plan had been to hold back for the first couple of turns, so much for the plan. On the right my mounted scouts fail to wound any of the mawbeast troop. 


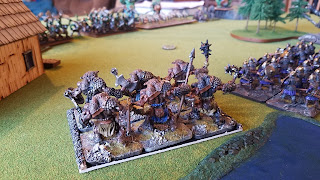
The ores glare at the Morax regiment in the distance. 

Turn 2- This doesn't look good, the knights are overwhelemed.

The vicotreious golbin regiments redpeloy to face the trhreat so  I throw in another knight regiment

Worried that instead of winning on the left I'm goin to collapse the flank i send the ores over as reinforcements. 

the genreal gets dreawn into combat wiuth Kulzo. My general continues his woeful record in hand to hand combat. 

Meanwhile one of the giants charges Josh's hero with a booomstick, flattening him and lumbering into the enemy end zone. 

On the left the mawbeasts are wavered. The king's chariot is destroyed by bowfire from the mounted scout regiment. 

End of turn 3, the mounted scouts on right have destroyed the mawbeast troops in hand to hand combat. 


Despite the odds the knights hang in there and await assistance. 

In the centre the orcs finally start advancing- my wizard has been blasting the unit on the right and has done a numbe of wounds. My eneral kills cut down by Kelzo. 

End of the turn- the ogres combined with the mounted scouts to destroy the goblins.  

Here they come! 

Yikes- the shieldwall was cut down to a man by two angry regmients of Morax orcs. 

On the elft I countercharge the mawbeast reiment, adding my scouts to the melee while my wizard holds the centrre together! The wizard destorys the right most Morax regiment with his boomstick. In the top riht corner a aint and mounted scout regiment gang up on one of Josh's giants and slay it. In the midle right my kniht regiment slams into the other giant. 

End of turn 6: Ond iant donew, one to go while the morax orcs camp on the cnetre objective. ?the score now is 3-3 but as you can see I've managed ot keep a lot more of my units alive. I want a turn 7, josh doesn't.. He rolls and we get one final turn. 

Bring it on! The last giant goes down. 

The giant destroys the oblin horde, the iant dies as do the Morax leaving a sinle model on table fo the goblins. 

This isn't going to end well for the orcs- both mounted socut units combine wiht the ogres vs the last Morax unit., 
Result: 4-2 to the Easterlings.

That was a great game vs Josh. We discussed things at the end and his failure ot push his giants and orcs forward early was probably a major mistake, as was my charging my knights into the chariot on turn 1. Overall I was happy with how the army went, I'm starting to get the hang of the mobility and love the versatility of the mounted souts- they did okay in bowfre, were great support units in hand to hand and were also nice bait/chaff units to protect my knights- and definitely more than earned their keep. 

How well did the mounted scouts do? They assisted in killing the bulk of Josh's army. The units circled are ones that they assisted destroying!

Hannibal would have been proud of the mounted scouts... as would Ghengis. Also, I thik the goblin horde may have been better off deploying in fornt of the orcs and simply charging my centre ASAP. 


The extra giant was handy too and I don't regret losing the bow unit or mounted general. I'm sure there are times I will miss a second general reroll but am happy with the balance of the army, now its a matter of getting to grips with the various combinataions and maximising my mobility whenver possible. I think I managed to support most of my attacks with the mounted scouts or other units when I could.

I much prefer the shieldwall to footguard, sure they died to a man but I want them as a defensive unit and to be able to manouvre the other units off so they work well in this role. Doing something useful is an added bonus!

I look forward to a rematch my Johs soon, it was a great game which we both hand chances to win.

Craig 


Wednesday, May 19, 2021

KoW vs Ken's Kingdom's of Men

 I popped down to the club for a rematch vs Ken and his kingdom of Men. Ken ran the same list as last week, I tweaked my own Easterlings (KoM) a bit more. The core remained the same but I wanted to see how regiments of mounted scouts performed vs troops, so downgraded the footguard to vanilla shield wall.

Ken's Kingdom of Men

  • 2x knight regiments
  • 1x pike horde
  • 1x footguard horde
  • Giant
  • Beast of war (mammoth)
  • Hero on peg
  • Mounted general
  • Wizard
  • Elven bows
  • Silverbreeze troop
  • Wizard
  • Some sort of Elf hero

Easterlings

  • Gen on fell beast
  • gen on a horse
  • mounted wzard with boomstick and a horse
  • 3x knight regiments
  • 2x mounted scout troops
  • 1x giant
  • 1x Shieldwall horde
  • 1x bow regiment
  • 1x Ogre horde (allies)
We played the invade mission, the objective being to get more of your troops onto the enemies side than they do yours. 

Deployment


Turn 1- Ken advances his troops

On my turn I advance the knights on my right. 

The pikes advance in the centre. 

The beast of war charges the human bowmen and damages but doesn't destroy them. 

The hero on a pegasus charges the mounted scouts, the knights were wavered by the elven archers.

Despite the odds the human bowmen do not break. 

Attack is the best form of defence. On the right Ken outnumbers me so I throw my knights into the charge to disrupt things, doesn't quite pay off though as his knights stick around. 

The mounted scouts charge into the flank of the beast of war but don't kill it. 

Which as you can see opened them up to a whole load of flank charges/ 


The giant bears down on the elven archers, shrugging of their bowfire though he did take a fireball in the face from a nearby wizard. The silver breeze in the backgorund were wavered.

Th melee betwen the knights continues but the giant has now stepped into to lend a hand so this will not end well for my knights. 

The two genereals duke it out and in time Ken's general wins. 

As you can see the knights have gone as have the mounted scouts and the beast is now engaged with the ogres. 

The hill is our and the mounted scouts are lining up a charge vs the wavered silverbreeze (just out of piture on the far left)

But in the centre the pike horde's relentless charge continues. I see your pikes and riase you... a unit of sheild wall? Again I throw my troops in first, simply to try to inflict a few wounds and slow the pike horde down. 

Oops, another misjudged range- I wasn't quite out of range of the giant. Only 4 wounds but then Ken rolled double 6!

I got lucky vs the pikes and wavered them with a double 6.

I have managed to kill the shieldwall protecting the flank of the pikeblock but was nice to see both Ken's supporting regiments flank my own shieldwall one they'd been pinned- a classic move.  

Somehow though my shieldwall continued to fight on. 

Nearing the end now, knights charge through a gap in the lines. 

In the bottom of the screen my wizard is about to be chopped to pieces by the elven hero. 

The shieldwall horde finally succumbs after taking 38 wounds! No double 1s for me on my nerve test. 

End of turn 6. My ogres and knights have just destroyed the pike horde. 

No turn 7. We added up the poitns,.

My ogres were just on the wrong side of the table, final score 630- 570 points to Ken. 

It was very close.

Another fun game and really starting to like the balance of my army, still not sold on the bows and maybe I will replace them with a troop of mounted scouts but getting a feel for the army now. I really liked running the scouts as regiments (14 bow shots or 14 attacks) even with no strength advantage is pretty handy at rnning down chaff units. 

Craig


Monday, May 17, 2021

KoW: Easterlings vs Free Dwarves 2000 pts

 I had training in Christchurch today for work so arranged to pop up on Sunday for a game of KoW vs Mark. I've been in contact with Mark a bit of late but had not met or played him before. I'd not been down to the CHCH wargaming club in a few years but caught up with a few old gaming friends and was great to see so many different games being played on a Sunday afternoon. 

Mark and I arranged a game of my Easterlings vs his Free Dwarves.  

Mark’s Fee Dwarf List:

  • 2 Ironclad Hordes with Mastiffs
  • 2 Shieldbreaker Regiments with Mastiffs
  • 2 Mastiff Packs with Mastiffs
  • 2 Rangers (1 upgraded to Herneas's Elite Rangers)
  • 3 Ironbreaker Cannons
  • Packmaster
  • Herneas the Hunter (using the newer Female ranger for him this game, so his sister Hernietta)
  • Bannick Kolearm

  My Easterling list

  •  3 Knight Regiments
  • 2 Mounted Scout Troops
  • 1 Bowmen Regiment
  • 1 Footguard Horde (Brew of Strength)
  • 1 Giant
  • 1 Allied Ogre Horde
  • General on Winged Beast
  • General on Horse
  • Wizard on Horse (Lightning Bolt, Boomstick)


Scenario is Plunder with five objectives down the centreline. The middle and right objectives form my armies point of view were worth two points so they were on the ones I was aiming for.

Mark has already posted a great battle report of our game yesterday. Mark's report is here.  

 My plan?

I wanted the far right objective, the two hills meant good terrain for my knights so ended up massing my three regiments there, on my left flank I hid my giant and ogre behind a wood, hoping to deal with a cannon or two with my scouts and then release the giant and ogre to attack the flank. I really wanted to get rid of those cannon as quickly as I could. 

In the centre I wanted to simply stay put and let the knights on the right try to sweep round the flank- nobody told the footguard commander (it would have been bad for morale) but their role was simply to refuse my centre and let them be target practice for the dwarven crossbows.

I had mobility to my advantage but Gordon has taught me to be wary or rangers and their annoying crossbows, while the infantry regiments and hordes would be hard ot shift too. Another difference being Mark include lots of throwing dogs (dwarven pilum) with his regiments.

Deployment


I really like Mark's heraldry on his dwarves shields, simple but striking. 

Turn 1 not much from the Easterlings, just probing forward on the left flank with the scouts and ogre. 

 The dwarves prime their cannons and keep a look out for giants. 

A very impressive battleline


The knights advance

I got lucky on turn 1 the two dwarf cannons that had targets both missed. 


Turn 3 (I think), my general on a giant flying chicken had just been blown to smithereens but the mounted scouts charged homeand routed the first cannon. 


The mastiffs look for scouts to attack. 

Mark focuses his fire on the left most knight regiment, leaving the other two intact- three regiments of knights are (IMO) better than 2!


The scouts having dispatched one cannon line up another one. 

The knights have taken 7 wounds but remain in the fight...for now. 


In the centre the footguard have taken 8 wounds from the rangers and dwarven heroes but shrug them off.  


Two units of knights slam into the shieldbreakers and Ironguard. 

The dwarf centre prepares to advance towards the objectives. 


The Ironbreaker horde had been destroyed for the loss of a regiment of knights. 


On the left the giant and mounted scouts have dealt with the last cannon and the ogres (well Reaper Bones D&D bugbears actually) are in charge range of the shieldbreakers. 

On the right the other shield breakers prepare to see off the knights. I am reasonably happy with the way things are looking. I now need to keep the dwarves away from that far right objective. 

A shot along the battleline. 


In the centre the footguard watch as the dwarves advance towards the other 2 point objective. 


23 wounds= one dead footguard horde. The rangers have done the damage here. 

I've managed to turn both flanks. 


The dwarf general and Bannick Kolearm (I think) trade ineffective blows against each other (1 wound each).


The ogres, giant and scouts gang up on the shieldbreakers
 
Having destroyed the Shieldbreakers the giants and ogres look for another target. 

Mark used his charactrer to destroy the scouts and protect the rangers flank. 

On the right the other shieldbreaker unit is ridden down. 

End of turn 6. We both had one objective. If we have a 7th turn I am feeling confident of claiming a 1 point objective but alas we rolled low and the game ended. 

Result: 2-2 draw.

A great game which ebbed and flowed nicely and i think the draw was a fair result.  Again I was surprised with how fast the game plays. it was all done in under two hours. Mark was a great opponent and I am keen to have a rematch one day soon.


Thoughts on the army so far 

 I’ve had a few games now trying to tweak things and starting to get a feel of the units that work for me and, I think, starting to get the army to come together the way I want it to.

Still making plenty of mistakes with facings and forgetting to move the odd unit but feel the army is starting to gel for me a wee bit.

 Mounted scouts: Really liked the charge vs warmachines and allowed me to than the flank early. 
I gave Mark two targets- general on a fellbeast or couts and was  able to drive home the charge with scouts as a result. On the other flank they also did well harassing the mastiff unit and took the objective for me.

I can now also see the advantage of Mt Sergeants for the charge home. My thoughts have been scouts with missile fire to harass and break up smaller (chaff) units but Mounted sergeants are starting to look more appealing too. Finally, I like the idea of running a regiment or two of scouts but find troops great chaff units and for harassing fire

 Ogres and Giant: This made a really nice 1-2 combo in this game. Add some mounted scout support they all work well together for a backup assault group. The Ogres with Def 5, 18 attacks at SC +1 are a nice little go forward unit which worked really well with the giant. 

Footguard: They held their ground well and the Def 5 made them last an extra tun or two, just not sure on them, too slow compared to the rest of the army going forward. My plan is to hold the centre with them and pivot off ether flank, so not sure the footguard are the best unit for this role, given the way I want to use them not sure that footguard  is the best use of points available but is definitely provides a solid core.

Other foot options? However, I will consider Def 4 units such as spears (phalanx) or even shieldwall to save a few points- i want them minaly as a efensive unit so not sure the footgurard is the bst option. I am also considering a horde of bowmen instead for massed missile support, we will see- which would play them more like both Mark and Gordon use their Dwarven rangers.

Mounted General- I found him easier to use than “the flying chicken” and very handy as a second very inspiring re-roll. Maybe give him the boomstick for a bit of long range reach? Being on a horse means I'm not tempted to completely fly off abandoning my regiments. He is a ice little sppoort option for the knights. 

The Giant War chicken of Doom (TGWCOD) aka General on a Fell beast: I see plenty of people recommending 3, personally can’t figure out 1. Need to not charge to quickly with him (or them). Two worked well but when points are tight I think one fell beast general and one mounted general gives me enough flexibility and saves points for more regiments.  

However, the general got  bit unlucky this game, Mark rolling 2x 10+ nerve test rolls to send him packing but see the potential in him.

Knights: The heavy lifting component of the army. Having 3 regiments was easier to manoeuvre than 2 regiments and a horde so think it is my preferred organisation. Massing all three units together definitely paid dividends. Mark was able to badly damage one unit but it still left two full strength units to charge home- concentration of force A lesson learned!

I like the idea of a 2 up, one in reserve formation and ned to remember to mass them whenever I can.

Bow Regiment: AA handy we support unit just chipping away, not sure whether to keep it or replace with more mounted scouts for mobility, we will see. They don’t do much but are anther regiment and help chpping away at targets.

 Craig