
Below is an O Group scenario I've come up based on the Japanese 25th army crossing the Strait of Johore onto Singapore Island on February 8th 1942.
Background
On Dec 8th 1941 the Japanese 15th
army invaded Malaya and over the next two months drove the British, Indian and
Australian forces of General Percival back towards Singapore. Disaster after
disaster followed and on the 30th of January the last battalion, the
2nd Argyll and Sutherland Highlanders, led by their last remaining
pipers marched across the causeway to “Fortress” Singapore.
The 22nd Australian
Brigade, 8th Australian Division was responsible for defending the
western coastline. Percival believed the Japanese would attack east of the
causeway and his deployment reflected this. The 8th division
consisted of 6 weakened battalions and
each covered a front of “tidal mudflats and mangrove swaps intersected by
stream and inlets, a defenders nightmare” (Thompson, 2005, p385). The three
battalions of the 22nd brigade covered a front of 16,000 yards, with
the 2/20th battalion holding 8,000 yards in front of the Kranji
river and Sarimbun island.
On 1 February when
Captain Gaven of A company 2/20th arrived in their defensive
positions on the position of the mangrove swamp he realised there were no
fortifications or defences and no field of view of the enemy approach (ibid, p389).
General Yamishita had outmanoeuvred
General Percival throughout the campaign
and on the 8th of February launched 16 battalions across the straits
of Johore against the three battalions of the Australian 22nd
brigade on the Western side of the island.
At 8:15 in the evening 168 artillery pieces opened up on the Australian
positions. The battle for Singapore had begun.
Mission:
Japanese: Destroy the
Australian forces by inflicting 3 FUBARS (12 losses) on the defenders or else get a platoon to successfully exit the
table on the far side from the Straits of Johore.
Australians: Inflict 14
losses on the attacking Japanese forces will allow the Australians to withdraw
in good order to positions further back in Singapore.
Deployment
The Australians are the defenders.
The Japanese are the attackers.
It is assumed that platoons and combat
patrols have landing craft and boats available but these can also be modelled
if available.

Special Rules
Battalion dice: The
Australians get 8 dice and the Japanese 9.
Defences: The Australians
can deploy 3 units in trenches.
Night attack: The Japanese
landed at about 8:45p. the entire game is played at night.
Johore strait: Units crossing the straits roll 2d6 and use the highest die (I assume the units have craft to cross the river, evne if not modelled on the table).
Visibility: The maximum
visibility for all units is 20”.
Australian Artillery Support:
British communications broke down and although they had artillery support the
British and Australian guns were not able to support the defending battalions.
No artillery support is available for the Australians except for Battalion
mortars.
Japanese artillery support:
The Japanese get 2 artillery missions and no smoke missions.
Japanese Reserves: A full
strength infantry company is available for turn 6 onwards on a 4+, check each
turn till the company arrives).

Terrain
Mangrove swamps: Count as Rough
terrain (RB p44) going. LoS can see a max of 1” into an area of mangrove.
Likewise a unit in a mangrove swamp terrain feature can fire out of it if
within 1” of the edge of the mangrove swamp.
Result
If the Australians win: They
have blunted the initial attacks and delayed the Japanese advance enabling the battalion
to withdraw in good order and are allowed 3 trenches and a hasty minefield in
the next battle.
Orders of
Battalion
Australians
·
Worn battalion
·
2x MMGs
Japanese
·
Full strength Infantry battalion (confident)
·
1x MMG section
Japanese Reserves
·
1x Full strength infantry company (available on
a 4+ turn 6 onwards, check each turn till the company arrives).
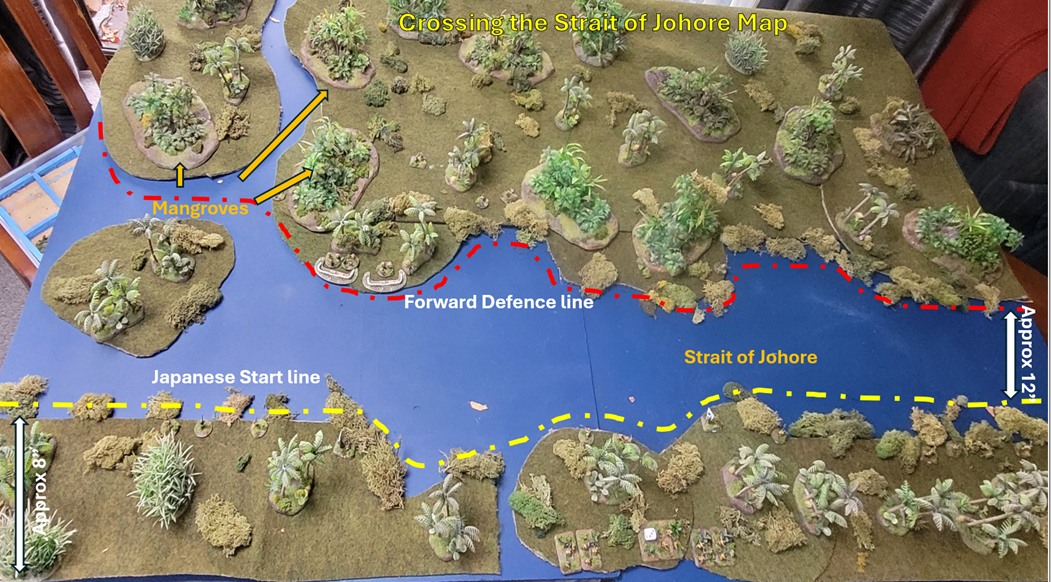
The Table
Historic Outcome
After intense
fighting the forward positions of the three battalions of the 22nd brigade were
overrun by the Japanese. Three companies of the 2/20th battalion
fell back to positions near Ama Keng village but the fourth company remained in
its forward positions and was destroyed. The Japanese exploited the gaps in the
thinly spread australain lines and by midnight the Japanese fired a sta shell
to indicate they had secured their initial objectives. In confused fighting
throughout the night the Australians were split into isolated parties and fell
back across while the Japanese continued to drive inland.
Night fighting
rules
The following rules apply to fighting at night.
|
Spotting
dice |
Units are
spotted on a following: 0-10” 4+ 10-20 “ 5+ |
|
Max range |
Units that
did not fire can only be seen a maximum of 20” unless they fired in their
previous turn. |
|
Obscured |
At night all
targets count as obscured no matter if they are in cover/terrain or not and
must use a spotting dice vs their target. |
|
Direct
fire to hit penalties |
-1 FP to
hit target at night with direct fire at ranges over 10” |
|
Artillery
HE penalties |
-1d6 FP
(represents not being able to see target accurately) |
·
Battalion diary: 2/20 Infantry Battalion
Jan-June 1942 https://www.awm.gov.au/collection/C1366606
·
Thompson, P, (2005); The Battle for Singapore,
Paitkus Books Ltd
·
Wikipedia: The Fall of Singapore